
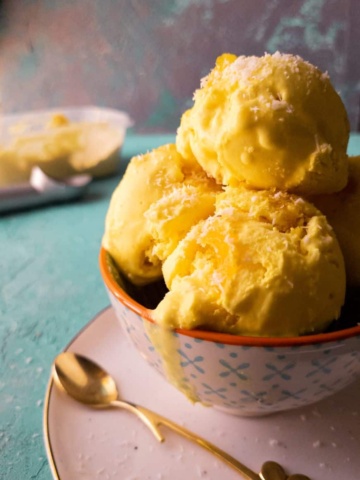
Malai Kulfi ice cream is literally the BEST thing about summers in Pakistan and India. My Kulfi recipe is a quick, no-cook version of the classic ice cream. It’s flavored with cardamom, saffron, and pistachios and has a rich, dense texture. Once you try it, there is no going back.

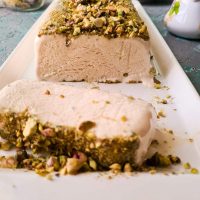
Traditionally you get Kulfi in Pakistan/India on the street in a clay pot or a stick, which looks just as cool. We will set ours in a loaf pan to make it look like a classy dessert. I love how Ice creams look set in a bar/terrine style serving. I made my delicious crunchy Lotus Biscoff ice cream cake the same way.
Jump to:
What is Kulfi
The world is no stranger to Malai Kulfi. If you’ve EVER visited an Indian/Pakistani restaurant, you’ve seen some form of kulfi on the dessert menu. It’s the South Asian equivalent of vanilla ice cream. And just like vanilla ice cream, Malai Kulfi is the most basic Kulfi recipe. You can adapt this recipe to create a ton of different flavors and variations (more on that later).
Traditionally, kulfi is made by slowly cooking sweetened milk until it is thickened and then frozen into molds. But honestly, that process is a little too long for my liking. And like I said when I found the quick rasmalai recipe, why spend more energy and time on something that already has an excellent shortcut, feel me?
Ingredients/Substitutions
You only need 6 ingredients to make this kulfi! Let’s go!

- Sweetened condensed milk
- Evaporated milk – I live in the Middle East and it’s pretty to get my hands on it. As a substitute, you can use milk powder and make a thick milk base.
- Thick cream – I use the tetra-pack cream for this recipe. You can use table cream, fresh cream or simply whisk double cream and make it thicker to use.
- Bread – The bread slice gives it the body and density of a traditional kulfi. A Brioche slice would taste awesome too!
- Aromatics – The main aromatic I use is green cardamom powder. But if you are feeling fancy, you can also use a little bit of rose water and saffron as well. Both are used in traditional Kulfis.
- Nuts – I use finely ground pistachio and coarsely chopped pistachio for this recipe. But feel free to substitute with any other nuts that you make like.
See the recipe card for full information on ingredients and quantities
How to make kulfi
To make the kulfi, we start with making the kulfi base.

Step 1 – Put all your ingredients in a bowl or a blender. (except for the nuts). Blend everything into a smooth ice cream base.

Step 2 – Cover the bowl and put it in the freezer for 3 to 4 hours or until half the ice cream has set from the corners.

Step 3 – Bring out the semi-frozen ice cream. It should be liquid from the center and frozen on the edges.

Step 4 – Use a hand whisk to blend the kulfi base. Break down the frozen chunks and whisk them all together.
PROTIP: If you want to add flavoring bits to your kulfi, now is the time. You can incorporate any elements you want, like chocolate chips or almond chunks. Just add in your components and beat for another 30 seconds.

Step 5 – Prepare a bread loaf pan by greasing it with butter or ghee. Now spread ground nuts to the bottom of the pan.

Step 6 – Pour the ice cream base into the pan and cover with cling wrap. Let it freeze for 8 hours or overnight.

Step 7 – Bring the kulfi out and let it thaw for 5 mins. Invert the loaf pan onto the serving tray and use a hot towel to wipe around the sides. Then knock on the base of your pan with your hand. Your kulfi should slide right out.

Step 8 – Cut the kulfi into slices and serve.

How to prevent ice crystals in a kulfi
This section is for all those who want to understand the science behind ice cream making a little bit more. The steps in my recipe already ensure a smooth crystal-free ice cream. But if you are a food geek like me, here’s some more info for you:
- Crystal formation happens when the time that an ice cream takes to freeze is very long. Double freezing the kulfi helps reduce the time it takes for the kulfi to freeze in the final step, as it is already at a lower temperature. The quicker the ice cream freezes, the lesser the crystal formation happens.
- Whipping the kulfi a second time also introduces air into the ice cream. This makes it more fluffy, and the texture becomes smoother.
- The second enemy of any good crystal-free kulfi/ice cream is air. Minimizing air contact once the kulfi is in the freezer is crucial to getting the perfect texture. The best way to do this is by covering the kulfi with a cling wrap directly on top of the kulfi so that the cling wrap sticks to the ice cream base.
- You have to keep in mind, however, that homemade ice cream that does not use a churner will only last for a month in the freezer. Over time they tend to deflate. Unfortunately, this is a reality for all homemade ice cream as they aren’t churned with a professional industrial-grade churner.

Flavors and Variations with a basic Kulfi recipe.
You can create these exciting flavors by mixing these add-ons into the ice cream base after the final whisking or by simply sprinkling them on top or base of the mold.
- Chocolate Kulfi – Add 1 cup of chocolate shavings to the Kulfi base.
- Almond / Pistachio kulfi (any nut kulfi) – Add chopped almonds/pistachios/walnuts to the ice cream base.
- Crunch kulfi – Add 1 cup of chopped-up hardened caramel to the kulfi base
- Rose kulfi – Introduce 2 tbsp of rose water in the kulfi base and some pink food color. Top it off with rose syrup (like rooh afzah or jam-e-shireen)
- Rose pistachio kulfi – Use my kulfi recipe and pour rose syrup all over it, it’s deliciousssss!
- Chocolate crunch kulfi – Chocolate shavings and caramel crunch bits.
- Toffee crunch kulfi – Toffee bits and caramel crunch bits.
- Kulfi falooda – Add the plain version of this recipe on falooda noodles and drizzle rose syrup on top.
Basically, anything you can chop and add to the kulfi base or sprinkle on top can become a flavor.
Expert Tips
- For clean edges, simply grease the pan with butter or ghee. If you are in doubt, you can line it with butter paper but know that it won’t give you smooth edges.
- For the nuts carpet at the bottom of the loaf pan, make sure your nuts are finely grounded to give you a sort of powder.
- The double freeze technique helps to give you a great ice cream texture. Whisking it introduces some air to an otherwise dense base and also reduces Ice crystal formation to give you a smoother end result.
- When doing the final freeze, make sure the cling wrap covers the kulfi entirely and is pressed down so that no air comes in contact with the ice cream.
Frequently Asked Questions
Home-made kulfis or ice creams usually should be consumed within a month as they may lose their texture over time. Always cover the leftover kulfi with cling wrap or foil before placing it back in the freezer.
If you are using a non-stick pan, simply greasing with butter or ghee should be enough. But if you are in doubt, you can try lining the pan with butter paper for an easier pull out.
Absolutely! You can use the same principles and pour the ice cream base into separate pops. Just make sure they are covered and not exposed to the freezer directly.
More ice cream and quick desserts


Do you have any questions? I’m happy to help! And of course, If you try this recipe, I’d loveeeee to see it or simply hear about it! Hit me up in the comment section below and I’ll get back to asap! Happy Cooking!
Malai Kulfi Ice Cream
Equipment
Ingredients
- 400 gm Condensed milk 1+1/3 cup
- 400 gm evaporated milk 2 cup
- 400 gm thick cream 1+3/4 cup
- 2 slices of fresh bread with corners cut off
- 1 tsp green cardamom powder elaichi powder
- 2 tbsp rose water optional
- 1/4 cup PIstachio powder
- 1/4 cup Chopped almonds and pistachio
Instructions
Preparing the Kulfi Base
- In a bowl add all the ingredients except pistachio powder and nuts.
- Blend everything together with a hand blender to get a smooth kulfi base. (you can also do this step in a blender).
- Cover the bowl with a cling wrap.
- Put the bowl in the freezer for 6 to 7 hours. (the corners of your bowl should be frozen and the centre still liquid)
- Preparing loaf pan.
- Put your pistachios in a chopper and make almost like a pistachio powder.
- Take out your non-stick bread loaf pan size and sprinkle the base the pistachio powder generously.
Assembling the Kulfi
- Take out the kullfi base and whip the base with an electric beater. Break all the ice crystals properly and cream a smooth base again. You can also add chopped nuts, etc at this point in your base if you want to.
- Pour your kulfi base into the prepared loaf pan.
- Place a layer of butter paper or cling wrap directly on top of the kulfi to avoid any air contact. Make sure to seal all the corners of the loaf properly.
- Place the load back in the freezer and let it chill overnight.
De-moulding the Kulfi
- Remove the frozen kulfi from the freezer and remove the cling wrap.
- Place it inverted on the tray you want to serve your kulfi in.
- Dip a kitchen towel in hot boiling water. Run the towel all around the loaf pan, including the sides and base for 2 to 3 mins.
- Lift the mould up (it is still inverted) and press the center of the base with your thumbs. This should release the icecream of the pan and drop it onto your serving dish. If the ice cream doesn’t drop, repeat the wet towel procedure once more and try again.
- Once your ice cream is released, sprinkle some more chopped nuts of your choice on top and serve immediately. You can also drip some rose syrup on top.
Azra Arif says
what a wonderful recipe. Gives a very perfect dish for special occasions. Everyone loved it at my iftar party. i loved tour details fir preparations thank you so much 💓
Wajiha says
hey Azra, always makes my heart full when someone tells me their guests enjoyedddd the food! yay!! so happy for u!
NAINA says
can we cook it?.Many thanks
Wajiha says
Hey, so this is a no-cook malai kulfi. Cooking will ruin the recipe and the kulfi. The traditional cooked malai recipe is different and made by simmering down milk for hours
NAINA says
hi lovely recipe, by chance can we cook it?
Maham Faizan says
This recipe looks amazing! Definitely trying
Wajiha says
yayy! cant wait to hear back from you
Salwa says
One bite of this took me back to the shaadi wali kulfi’s we eat back home. Such an easy and quick recipe and a total crowd pleaser. All the tips and hacks on the blog made it absolutely fail-proof. Thank you so much.
Wajiha says
MY heart is full! thankyou for dropping by Salwa
Anonymous says
The taste of this Malai Kulfi took me back to the shaadi wala kulfi we enjoy back home in India. Can’t believe how quick and easy this was and such a crowd pleaser. All the tips and hacks on the blog made it so much easier and fail proof. Thank you so much for sharing!
Wajiha says
Shadi wali kulfi is the best! Loved hearing from you!
Anonymous says
Very delicious excellent super duper recipe and very easy to make
Wajiha says
wooho! so glad you liked it!
Anonymous says
This is an excellent recipe. My wife commented it is the best malai kulfi she ever had and I have to agree, it is really amazing!!
Wajiha says
I’m just so happy you could put a smile on your wife’s face! 🙂 this just made my day
M says
Could you let me know the purpose of the white bread slices? What would happen if i omit it or is there an alternative to add? Also it’s white bread only correct?
Wajiha says
its white bread only without the edges yes. white bread slices add the classic kulfi texture to the ice cream base. You can skip it if you don’t want to. Just increase cream by 1/2 cup. Although I highly recommend bread for perfect results
Twocloveinapot says
This recipe is bomb. It’s my second time making it. LOVE LOVE LOVE IT! MUST TRY!!!!
Wajiha says
awww! 🙂
Javairia Ahmad says
Such a perfect fool proof recipe! Have tried it multiple times and it a a crowd pleaser every time :)) The bar presentation makes it too pretty to eat :)))
Wajiha says
I love this review so much! thankyou Javeria
Manfarah khan says
This recipe made one of the best kulfi’s I have ever had. My husband was a bit skeptical about me trying to make kulfi from scratch for our families and tried to convince me to get the boxed one but I was determined from the day I saw this recipe. It was so easy to make, all the instructions are so clear. It was definitely the dish of the day ????.. I guess I will be making it every time I get a chance. ????Thank you Wajiha .. can’t wait to try more of your recipes.????
Sidra says
Such an easy recipe to make. Turned out absolutely amazing. It was so creamy and smooth…no ice crystals!! Loved it ❤
anonymous says
a perfect recipe to attempt for a hassle-free get-together/family dinner.. attempted it twice and the results were beyond perfection every time.. the taste turned out Heavenly, everybody was asking for the secret recipe to get that smooth creamy mixture. A must try for everyone as its so easy and prepared with only a few ingedredients before-hand (prepared a day before the party)
Wajiha says
eeeeee! makes me so happppyyy! Im sooooo happy to know my food could bring you joy 🙂 hugsssss