
These frozen parathas are a LIFESAVER on lazy days when you want proper meals but also don’t want to spend a minute extra in the kitchen. Homemade frozen parathas (fried flatbreads) are a much more nutritious, and sustainable option than the store bought ones and um…they taste like real parathas ( a…yess offense packaged “parathas”)
You don’t need to sit and spent an entire day in the kitchen rolling out parathas to freeze. You can simply use the leftover roti/chapati dough every other night and use it to freeze parathas. I roll out 1 or 2 parathas every time I have said leftover atta. And before I know it, within a month I am looking at a stack of fresh homemade 30 40 parathas, which btw is a LOT! and perfect if you are meal prepping for Ramzan (Muslim fasting month)
FAQS
Can you freeze fully cooked paratha?
Fully cooked parathas usually don’t do well in the freezer and somehow or the other, their taste, texture and softness doesn’t last. Unfortunately my friends, I’d have to say NO to this.
Is frozen paratha good for health?
The parathas you get in the store are normally made from the same dough they make puff pastries from. This is because, they need a large quantity of fat to keep commercially produced parathas soft on the inside and crispy on the outside. Even if they offer you whole wheat options, they are still giving you a ton of butter with it. Since paratha is something us brown folks consume on a regular basis, buying the store bought ones might not be such a good idea. Ofcourse, the one you freeze yourself at home is wayyyyy better, infact its nutritious! Using good quality organic ghee, and wholemeal wheat flour, your homemade parathas can be a good source of Vit B, fibre and good carbs. Plus no added preservatives is always a bonus
How long can I freeze the parathas for?
They can last upto 2 months in the freezer and sometimes 3. Beyond that, they might be subjected to freezer burns because alas, we aren’t using a truck load of butter/ghee in them, so the shelf life is limited.
Can I use oil instead of ghee?
You can most definitely use oil instead of ghee, but then opt for freezing method 2 for better results. (see under freezing section)
Ingredients

- Chakki Atta (Wholemeal wheat flour) – Chakki Atta is the best option to make parathas or rotis and is the choice of flour in most brown households for all types of flatbreads. It is definitely more nutritious than all purpose flour. Please note, Chakki Atta is different from the regular whole wheat flour you get in American grocery stores. So if you want to make authentic parathas, look for chakki atta specifically. You can find them in Asian grocery stores.
- Salt – Goes without saying but your parathas need seasoning too. A few pinches of salt ar enough to add flavor to your flatbreads.
- Water – Room temperature or lukewarm water works best for kneading the dough.
- Melted Ghee (clarified butter) – We are going to need ghee in the dough as well as while rolling and folding the parathas. I prefer using melted ghee because you end up using less this way. Since so many steps involve applying layers of ghee, you will end up using more than a tbsp per paratha is you use solidified ghee. If you want, you can use oil too, but the results may vary with it.
Prepare Dough
For preparing the dough, you can use a stand mixer with the hook attachment or simply do it by hand. There’s a small video tutorial at the end of this post too!
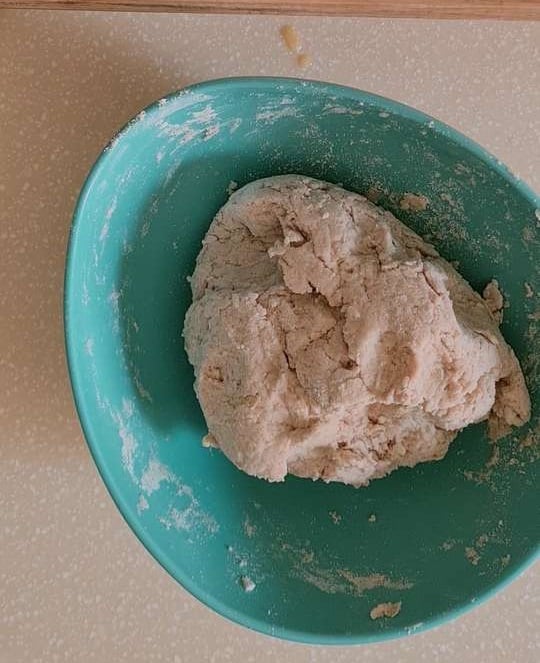
Start with flour, salt and melted ghee. And allow the ghee to spread evenly throughout the dough. Then slowly starting adding water until your flour is fully combined. You are NOT kneading at this point. Simply allowing all the flour to soak up water and form a dough. It may seem crumbly or not smooth, which is fine! Trust the process!
Cover the dough with cling wrap and let it rest in the fridge for 30 to 40 mins. This allows the gluten in the dough to be activated and makes kneading much easier.
A well rested, cold dough is easier to work with and gives you a
good paratha/roti texture.

Take out your dough from the fridge and now knead it for about 5 to 6 mins with your fists. You will eventually get a uniform smooth dough, that springs back a little when you poke it. Now you can decide to roll out the parathas straight away or keep the dough back in the fridge, where it can last for 5 days.
Instructions
Rolling out Parathas

Step #1 
Step #2


STEP 1 & 2– Divide your dough into smaller segments and make small dough balls from your dough. Coat with lose flour before placing them on the countertop.

Step #3 
Step #4
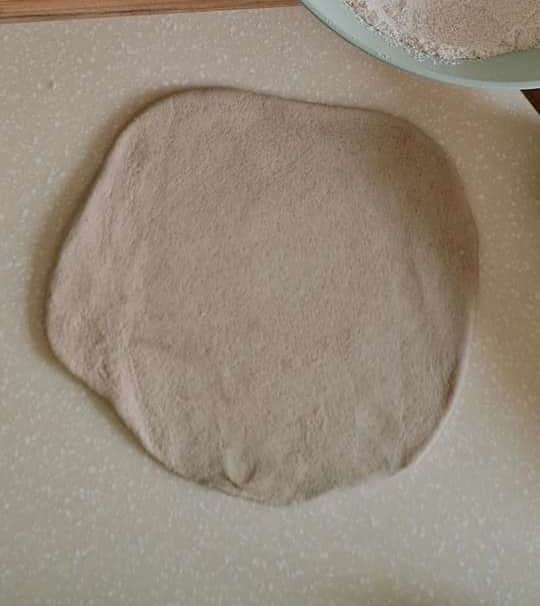

STEP 3– Flatten the dough balls by pressing them with the palms of your hand. Flatten them as much as you can with ease. Sprinkle more flour on the dough discs if they become too sticky. Use a rolling pin to flatten out one dough disc into a medium disc shape. The shape doesn’t need to be perfect. Just a rough round shape is good enough.
STEP 4 – Use a brush and cover the surface of the disc with ghee. Sprinkle some lose flour on top of the ghee and start folding as shown in the pictures below

#5 Lift one edge and fold in 
Step #6 Lift the opposite edge and fold in.

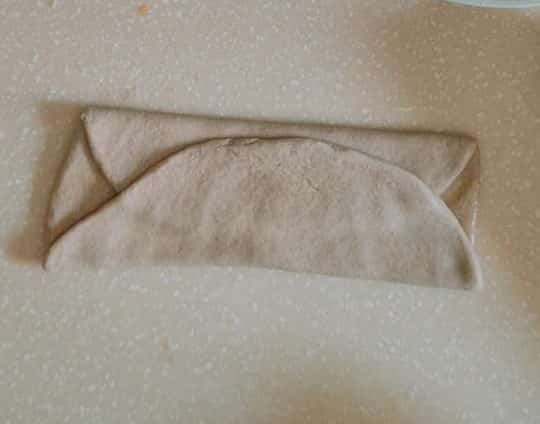
STEP 5 & 6 – Lift one edge of the disc and fold towards the centre. Now do the same on the opposite side to form a burrito.

Step #7 
Step #8
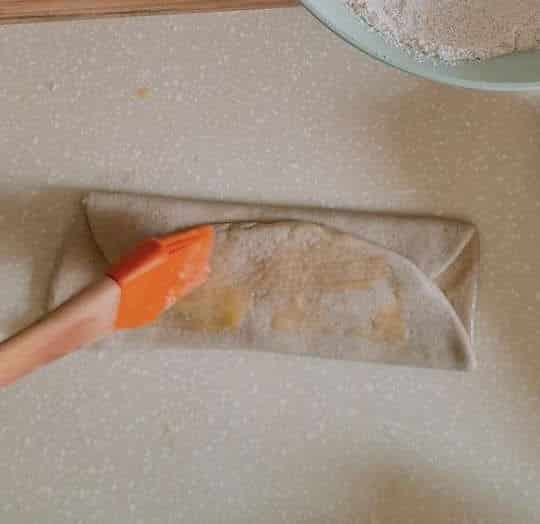

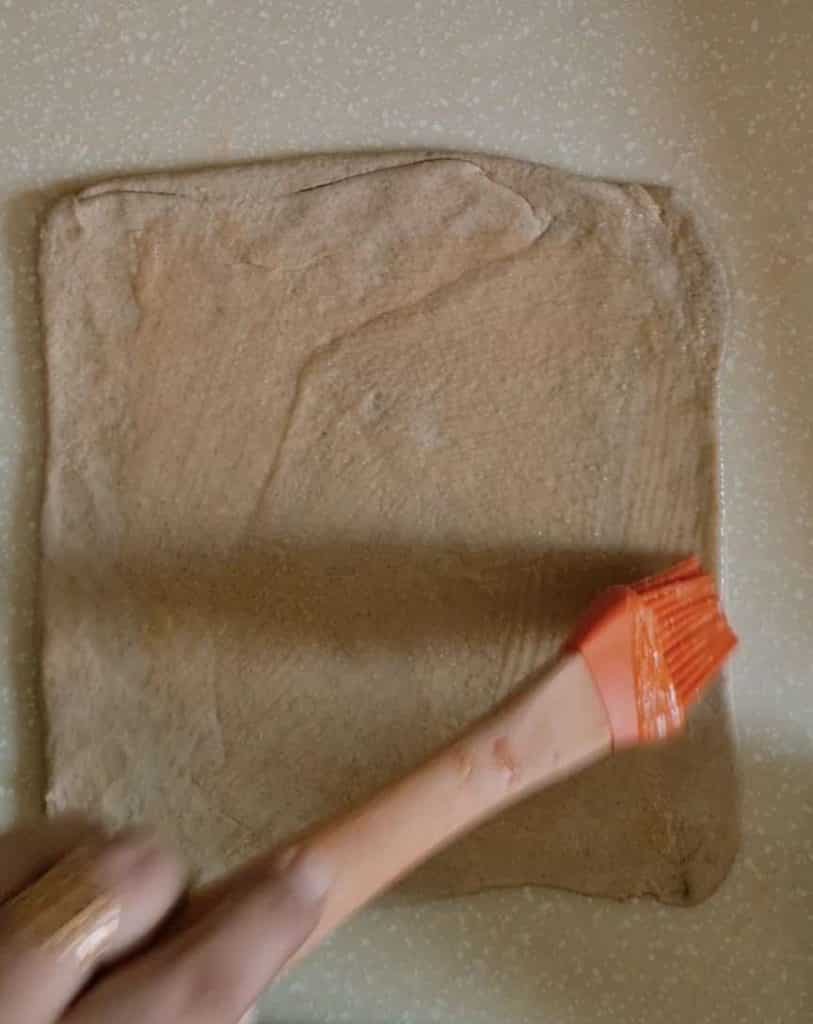
STEP 7 – Use the brush and cover the surface of the exposed top of the paratha and sprinkle some lose flour again.
STEP 8 – Bring in one of the open ends of the paratha towards the centre and bring the other to overlap the first one to form a square.

Step #9 
Step #10
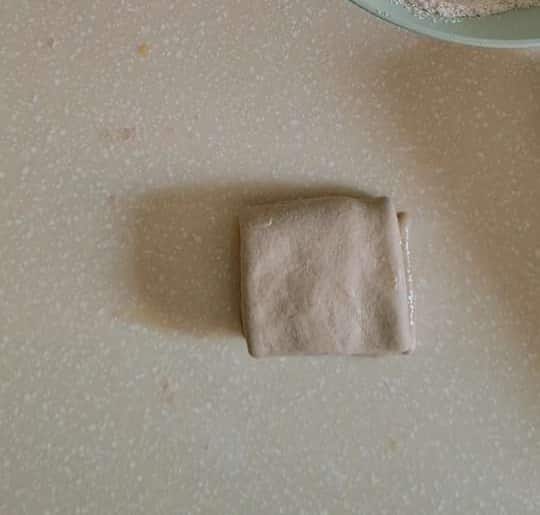

STEP 9 & 10 – Coat the square dough with flour again and roll it out to form a square paratha. Sprinkle lose flour again if the dough becomes sticky. Parathas are thicker than rotis when rolled out.
How to freeze paratha
There are 2 methods to freeze parathas, you can use whichever one you find easier. For both methods, you will needs sheets of butter paper or wax paper, and a ziplock bag or an airtight box.
METHOD 1 – FREEZING RAW PARATHAS
In this method, you simply brush some melted ghee on either side of the rolled out paratha and place them on a sheet of wax paper. Add another layer of wax paper and layer the rolled out parathas this way Keep the tray in the freezer to turn the parathas solid. Once they harden up, transfer them into a ziplock bag and store for upto 2 months

METHOD 2 – FREEZING SEMI COOKED PARATHAS
Another approach is to half cook the paratha before freezing. Heat a pan and cook the paratha on one side long enough to see the color of the paratha change on top. When that happens, remove the paratha and keep on the side to cool down. Stack the parathas with wax papers in between each paratha and since these aren’t delicate, you can directly put them in a ziplock bag and freeze (for upto 2 months)

Cooking Frozen paratha

Place frozen paratha on hot pan (not thawed) 
Flip 
Flip again

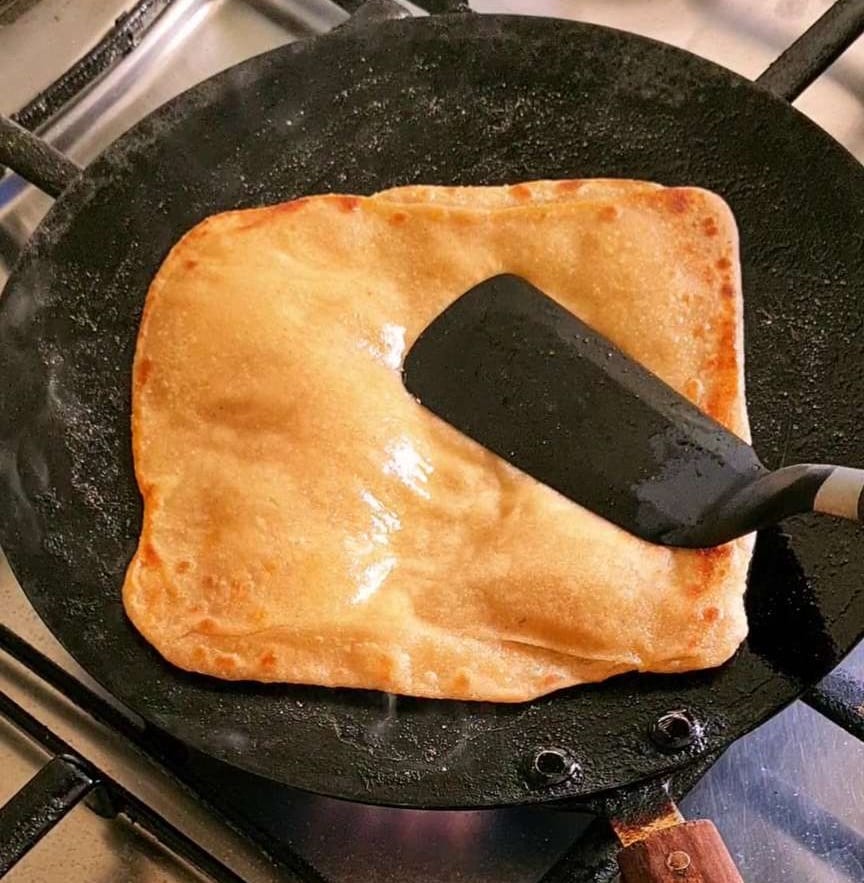

You don’t need to thaw frozen parathas. Simply place the solid paratha on a hot pan and brush a little ghee on all corners. Flip over when the top changes color. Brush ghee on this side too and flip over when the bottom gets nice golden brown color all around.
Enjoy with your favorite curries, kebabs.
Expert Tips
- Make sure your ziplock bags are sealed properly. You can use a box or a zipper bag to store your parathas but it needs to be airtight. The freezerburn from being exposed in the freezer is real and will make your parathas hard when you make cook them.
- Always use oil or ghee in the dough when making frozen parathas.
- Sprinkling flour on ghee while folding the paratha gives it better layers and makes it flaky.
- Label your bags with dates of when you started adding parathas to it, so that you have a rough estimate of when your parathas will expire.
- You can prepare a big batch of parathas to freeze together all in one go or do it in increments, every other night when you are making fresh parathas, just roll out 1 or 2 extra and freeze!
- On those lazy days, bring out some frozen dam keema (slow cooked beef mince) or frozen chicken curry from your stock, pair it with your frozen parathas, and you have to hardly spend 10 mins in the kitchen max to serve food.

Similar Tutorials
How to make crispy fried onions for curries
How to make Chili oil

How to freeze parathas
Equipment
Ingredients
- 3 cups Chakki Atta Flour wholemeal wheat flour see notes
- 2 tbsp melted ghee clarified butter for dough + 3 tbsp for layering
- 1½ cup warm Water or as needed.
- 1/2 tsp salt
- more ghee needed if cooking on the spot
Instructions
- In a bowl, add flour, ghee and salt. Mix well.
- Now add water gradually and knead the dough as you go. You can do this manually by hand or use a stand mixer with the hook attachment.
- Once your dough is mixed, don’t knead any more. Transfer the dough into a clean bowl, cover it and refrigerate for about 15 to 20 mins.
- Bring out the dough and now knead for 5 mins with your fists. Knead till you get a smooth dough.
- Make small dough balls from your dough. And keep placing them on a surface that has been sprinkled with flour.
- Flatten the dough balls by pressing them in the palms of your hands. Flatten them as much as you can with ease. Sprinkle more flour on the dough discs if they become too sticky.
- Use a rolling pin to flatten out one dough disc into a medium round shape.
- Use a brush and cover the surface the rolled out dough with ghee.
- Lift one edge of the disc and fold towards the centre. Now do the same on the opposite side.
- Your paratha should look like a log right now. Use the brush and cover the surface of the exposed top of the paratha.
- Bring in one end of the paratha towards the centre and bring the other to overlap the first one to form a square.
- Dust the square dough with flour and roll it out to form a square paratha
- TO FREEZEMETHOD 1 – RAW PARATHA
- In this method, you simply brush some melted ghee on either side of the rolled out paratha and place them on a sheet of wax paper.
- Add another layer of wax paper and layer the rolled out parathas this way
- Keep the tray in the freezer to turn the parathas solid.
- Once they harden up, transfer them into a ziplock bag and freeze.
METHOD 2 – HALF COOKED PARATHA
- Heat a pan and cook the paratha on one side long enough to see the color of the paratha change on top.
- When that happens, remove the paratha and keep on the side to cool down.
- Stack the parathas with wax papers in between each paratha and since these aren’t delicate, you can directly put them in a ziplock bag and freeze
- COOKING
- You don’t need to thaw frozen parathas. Simply place the solid paratha on a hot pan and brush a little ghee on all corners.
- Flip over when the top changes color.
- Brush ghee on this side too and flip over when the bottom gets nice golden brown color all around.
- Serve with your favorite curry or kebab.
Notes
- Chakki atta or wholemeal wheat flour is different than regular whole wheat flour, you can find it in Asian grocery stores. Most bags also have pictures of roti or paratha on it.
- If you don’t want to roll out parathas straight away, keep the kneaded dough back in the fridge where it can last upto 5 days
- Your frozen parathas can last 2 months.
- IF you want to use oil instead of ghee, go for method 2 of freezing.
- You can use any other folding method than the one mentioned in the this post as well.
Anon says
hii…im a student so freezing parathas does me a hugeeeee favor its soo difficult to make parathas for every meal…its a pain…just wanted to ask what would be the difference in results for completely raw vs slightly cooked? also which method would be better if i go light on fats and plan to prep simple rotis???
thanks 😊
Wajiha says
hello! completely raw parathas are crispier when cooked. Slightly cooked parathas are generally softer. Shelf life and taste wise both are exactly the same. IF you are going light on the fats, I’d recommend going for the slightly cooked version.
noreen says
this is so in depth. thanks for this. although im a nppb and dont know how to knead flour. was hoping your small video would cover it. but unfortunately wheny ou started mixing butter it skipped over to the end product (the dough ball)
anyway i have a question regarding kneading. so you said above that we have to just loosely combine ata, water, ghee salt and referigerate and then knead. so how loosely are we talking here? like can we mix these ingredients with spoon and leave them in the fridge or are we shaping it into a rough dough and then putting in the fridge?
Afreen says
Shall definitely try and tag you ????
Wajiha says
woohoo can’t wait to see it 🙂
Anonymous says
So in depth. Loved it
Wajiha says
I am glad it helped 🙂